Sunday, January 30, 2005

Bulsontown to the Timp hike

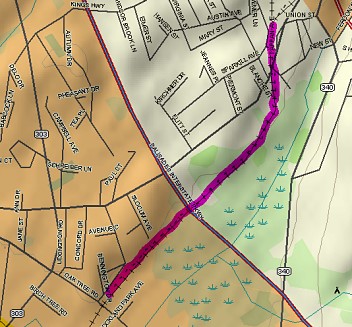
This morning I went snowshoeing with Rob and Jason. Here's the map and elevation profile:


Reading from left to right, the hike up is the first section, the hike up, onto, and off the Timp is the second section, and the hike down is the last two sections.

The hike we attempted was from Bulsontown (which seems to be a collection of ten houses) to "The Timp" and back. We started hiking at around 9:30am.

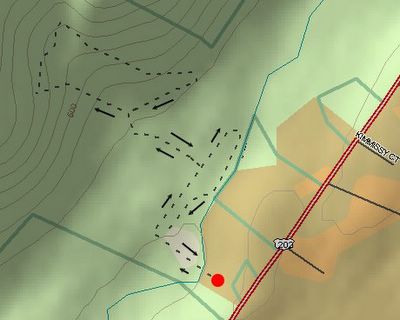
We started up Beechy Bottom "Road", looking for the unmarked Woods "Road":


We couldn't find it, so we hiked cross-country back to Beechy Bottom "Road" (waypoints 2 and 3) (looking at the map above, we started in the lower left section of the map. Our outbound leg is the leftward track on the map.)

Up and up we went. We passed several unmarked trails which appeared on the map, and crossed a couple streams:


For most of the way, we were walking over prints made by other snowshoers. It took us about 2 hours to cover the 2.1 miles to the end of the "Red Cross" trail, which got us to Timp Pass. The last 1/3 of a mile was really steep:


Along the way we passed some nice ice formations:


At last, we made it to Timp Pass:


By now it was 11:45, and Rob really needed to get off the mountain, so we turned on the FRS radios, and Rob started down while Jason and I attempted to summit the Timp. Doesn't look like much in this picture, but it was sizeable. We decided to go counter-clockwise (see map) by taking the Ramapo Dunderberg trail to the Timp-Torne trail to Timp Pass "Road" and back to the Red Cross trail at the Timp Pass. While hiking on the R-D trail, we were right under the timp. The trail had not been used since last week's snowstorm, so we had to rely on the blazes to stay on course.


The ascent of the Timp was extremely steep - Topo USA reports a grade of 40% in places. We were worried that the descent would be as steep. Along the way we passed more ice formations:


At last we reached the top. Looking south, we could see the Hudson river. On a clear day the Manhattan skyline can be seen:


Here's Jason at the summit:


As we began our descent, the Bear Mountain bridge was visible to the north:


More ice along the descent:


As the completed our descent of the Timp, Rob radioed us from down the trail that he had gone as far as he could without a map. It was 1pm, an hour past when Rob wanted to be off the mountain. I asked Jason to turn on his radio, and ran down the mountain (the third section on the profile above) until I caught up with Rob. We walked out to the trailhead, and Rob went down to his car while I went back to meet up with Jason. We ran in to each other about 2/10 of a mile from the trailhead. It was around 2pm when we got to our cars.

The trip was a success, I think, except for the whole "split up the party just asking for a mountaineering disaster" thing. The crampons on my Redfeather snowshoes each lost one tooth on this, their first real hike. You get what you pay for, I guess. I think I'll buy a pair of Tubbs - Jason and Rob rented them from EMS, and they held up just fine.

Thursday, January 27, 2005

Like a bird feeding it's young....

I've coughed up an adventure page for you. Not exactly fresh, but it still has a certain....

....flavor?

Not the best metaphor, I guess. Oh well, enjoy it anyway.

A new sport for Ben

After the Sunday snowshoeing adventure, I bought a pair of real snowshoes. And my boots don't fit (turns out that, as you get older, your arch flattens out, making your feet effectively longer.)

At least, that's what the 17-year-old boot guy told me. "Not that you're old," he said.

Thanks kid, I'm only twenty-

Never mind.

Anyway, I bought some new boots. On sale for $105, they were. I went from a Vasque 9.5 narrow to a Montrail 10.5 regular. I will miss my old boots, though. We've been together since '92. Back when they were made in Italy.

Tonight I bought some new gloves for snowshoeing. Ski gloves are great for sitting on the lift all day long, but when you're hiking along, they're a little too warm. My long fingered cycling gloves are great, but they're fleece, so when they get wet, they're wet.

I'm hoping for a lengthy snowshoeing trip on Sunday.

As a hold-me-over, I went snowshoeing over lunch a couple days this week. The Joseph B Clarke Rail-Trail is less than a mile from my work, so on Tuesday I started at the southern terminus on Oak Tree Road and went North to the Village of Sparkill. It was about 2 miles round trip:


On Wednesday, I drove to Sparkill and continued North to Piermont. Again, about 2 miles round trip:


I used my old boots, since I was still breaking in the new boots, but since the old boots are too small, I can only wear a single layer of socks, so I got a "hot spot" on my right heel. Hopefully by Sunday it will be better.

Sunday, January 23, 2005

Sunday Stuff

We had quite a storm this weekend - by the time it was over we had 8-10 inches of snow.

I decided to go snowshoeing, but there weren't any snoeshoes left to rent at EMS, so Trish picked up a $20 pair of plastic-tennis-racket snoeshoes for me. They fell off a half dozen or so times during my hike.

I started at Kakiat County Park. The route was about 1.7 miles and took about 90 minutes. Here's the map:


Along the way I stumbled onto this old car:


Here's the old mill (on the Old Mill Trail):


Right before returning to the trailhead, I took some pictures where the trail crosses the Mahwah River:


Tuesday, January 04, 2005

Collateral damage?

From this article at the Jerusalem Post:

...The sources also spoke of an assessment in the IDF that Arab terrorist organizations are stepping up their efforts to obtain weapons of mass destruction, including nuclear bombs.

They noted that there is now evidence of increased debate as to whether Islamic law could allow for the deaths of Muslims as part of the price when tens of millions of heathens are killed — a debate whose very nature, the sources said, implies that thought is being given to the notion of using weapons of mass destruction.


Can the answer be "no"? Please?

Monday, January 03, 2005

The new pan and tilt camera

A few weeks ago I bought a DLink DCS-900W camera for keeping an eye on the kids while they were playing. A couple weeks ago, X10.com had a great deal on their Ninja Pan and Tilt camera mounts:


The Ninja pans 210 degrees left-to-right and 130 degrees top-to-bottom. It is controlled by the wireless remote shown in the picture above.

Of course, since the DCS-900W has a web server in it, and it can be viewed from anywhere, I thought it would be nice to be able to control the pan and tilt over the Internet as well. The X10 software solution requires keeping a PC running all the time, and they control how the video is shared on the web, and it only works with their video input widget. I wanted a more general solution, a way to control the Ninja via my Crestron control system.

My first thought was to simulate button presses on the remote using the relays on the control system. Looking at the schematic from this document, I saw that the buttons are arranged in rows and columns. As the document states:

The main keypad consists of a matrix of rubber buttons with a conductive rubber section on the bottom. Pressing a button causes contacts that have been printed on the circuit board to short. This combination of the conductive rubber buttons and the circuit board effectively form a pushbutton switch matrix.

The matrix is formed by 3 columns with pushbuttons connecting them to one of 6 rows. The columns are connected to the CPU at pins RA0, RA1, and RA2. The rows are connected to RB0, RB1, RB2, RB3, RB5 and RB6.

When the CPU is scanning the keypad matrix, it sets all but one of the aforementioned RB lines high (logic '1') in a bit chasing pattern. That is, first RB0 goes low, then RB0 goes high and then RB1 goes low, etc. This will sequentially force one of the 6 rows low while the others remain high. If a button is pressed on the row that is currently low, it will also force the corresponding column low as well. Since the CPU knows which row was being held low, it can easily determine which button was pressed by comparing to the column that is also low.


So, I found the contacts on the board that were for the rows and columns that contained the up, down, left, and right buttons. To round out the matrix, the up and down buttons actually have two contacts, but I only had to short one of them to get the camera to move, so I was able to get away with four wires - two for the two rows, and two for the two columns. I took me a while to realize this, though, so initially I soldered on 6 wires:


I got everything wired up, but the camera would only go two of the four directions. After double checking my wiring, I took the circuit to work, because I thought there was something fishy going on with the Pro2's relays. It turns out that there's a movistor across the output pins of the relays to protect them from high loads. Unfortunately, the movistors have enough of a capacitive effect that, when a relay on row 1 column 1 was closed, the signal would flow from the now active leg of the relay for row 1 column 2 (the row 1 wire) through the movistor to the other leg (the column 2 wire) and the remote would think that row 1, column 2's button was pressed.

Grrr.

Then I figured I would drive my own relays using the versiports on the Pro2 (see pages 29-32 of this manual for information on versiports). Speaking with the guys in hardware, it sounded like the versiports didn't provide enough current to trip the relays. One of the guys suggested I use a couple of 4501 multiplexing switch ICs to simulate button presses. I soldered up a circuit board with two 4501s, one for each column:


At first it wasn't working at all, until someone explained to me that with CMOS ICs, unused pins should be tied to ground (see page 10 of the datasheet). Once I did that, it worked well. The only thing I didn't realize is that the ICs only promise to act as switches when they are properly powered. Since I am powering my circuit using one of the versiports (kept always on), when I unplug my contraption from the control system, my board loses power and current is allowed to flow from a column to a row through the now un-powered circuit, and the camera begins to move. I could have solved this by powering the remote from the same source as the remote.

Once I realized that was the problem, I put my circuitry into an enclosure. The board I bought for my circuit was cut to be the width of one of the widthwise circuit board slots in the case:


I added a switch to turn off power to the remote so it wouldn't cause the camera to move when the circuit was unplugged from the control system. I used an RJ45 jack on the enclosure since I have several very long ethernet cables (the remote only have a range of 30 feet or so, so if I want to put the camera far away from the control system I've got to get my remote close enough for the Ninja to pick up the RF signals from the remote.


In a word, it works very well! I made a web page that shows both the Camera ActiveX control for showing the video, and the Crestron ActiveX control for interfacing with the control system.

Sunday, January 02, 2005

Sunday Stuff

Lots of little stuff this weekend (I was off on Friday).

Last week, our friends the Bahns, from Minneapolis, stayed with us for Shabbos. The Bahns had us over almost every Shabbos when we lived in St. Louis Park during my second year of Graduate School:


When they walked up our driveway, they saw a kid (dare I say "punk"?) checking all the mailboxes, probably for holiday cards (he obviously wasn't very bright - he's checking mailboxes in the world's largest suburban Jewish community (I guess a school budget of $18000+ per student per year just isn't enough)).

Anyway.

So I decided to install a locking mailbox. Trish wanted to be able to get the mail when she goes down the driveway without having to get out of the van, but the ground is frozen, so I couldn't move the mailbox post. Only one solution therefore remained:


Trish seemed less than thrilled. Sure, it's ugly, but it's so cool! :)

The water flow in our fish tank had slowed to a trickle, so I rebuilt the pump system of my Eclipse 3 Hood. The plants growing around the intake had grown roots into the intake and began trapping particles. When I took it apart, the intake was completely full of mud. Wow!